GUIDES
-
1. WASHING AFTER LAYING
After grouting, it is fundamental to clean the surface well.
This operation is performed to eliminate:
– Grout and general residue from laying.
– Building site dirt and superficial residue of material.
For this operation Fila proposes DETERDEK, the acid-reaction detergent which does not emit harmful fumes and, even in this case, does not spoil the grouting or the colour
of the material. Please follow UNI11493.2013 standards
Final cleaning to be performed at complete drying of grout, as specified on manufacturer technical data sheets.
Product: DETERDEK diluted in water in proportion 1:5 (with normal dirt)
Tools: Flat brush or single-brush machine with green disc. Liquid vacuum cleaner.
Sweep the surface well and wet it with water. Distribute DETERDEK diluted according to the degree of dirt. Let it act for a few minutes and then clean with a single-brush
machine with green disc or with a flat brush. Collect the residue with a cloth or with a liquid vacuum cleaner. Lastly rinse with water.
In order to fully remove residues of epoxy grout, we suggest using specific detergent FILA CR10 or FILA PS/87.
Before cleaning whith FILA CR10 wait for grout running time, carefully following tips below:
– Apply directly to dirty surface using a flat brush, perfectly covering any grout residue.
– Let it act about 30 minutes
– Brush with abrasive sponge or brush on tough residues. To apply on floor pls use single-brush with most appropriate dise
– Rinse with water
– Repeat all above steps in case of stubborn residues.2.PROTECTION OF POLISHED PORCELAIN TILES
Having carefully washed the material after laying, it is possible to proceed with the protection.
Advantages of protection:
• it prevents absorption of water and oil stains
• it makes maintenance simpler
• it prolongs the life of materialsFILAMP90 is the best stain protection for porcelain tiles. It doesn’t alter the natural colour of surfaces and it is certified as suitable for use on food contact surfaces.
Application:
1. Use a flat brush
to spread an even coat of FILAMP90 onto a clean and dry surface.
2. After 24 hours, when the floor is dry, remove the excess using a single-disc professional cleaner (white or beige disc) or a household polisher fitted with felt pads.
3. Stubborn residues can be removed with a cloth dipped in FILASOLV.3.PROTECTION OF LAPPATO PORCELAIN TILES
Having carefully washed the material after laying, it is possible to proceed with the protection.
Advantages of protection:
• it prevents absorption of water and oil stains
• it makes maintenance simpler
• it prolongs the life of materials
FILA STOP DIRT is a specific dirt repellent protector for all kinds of lappato porcelain tiles. It penetrates deep down, protecting against wear from traffic and the accumulation
of dirt. It adds shine to the material, enhancing its natural colour. The product provides stain protection for the surface and also the cementitious grouting.
Application:
Apply FILAPD15 to clean a dry floor, covering the surface evenly (including grouting) with a microfiber cloth sponge or fleece applicator pad. Rub the surface with a cloth or
single disc machine with white disc to help the product penetrate. Remove any residue within 10 minutes, using a microfiber cloth or single-disc machine fitted with a white
pad. We recommend applying the product 2/3 m² at a time. The surface is ready for use after 8 hours.4.CARE OF ALL SURFACES
Ordinary maintenance:
For cleaning the floor it is recommended to use a neutral detergent with a high cleaning power such as FILACLEANER, ensuring fast and efficient cleaning while respecting
the treatment at the same time.
Dilute one cap of FILACLEANER in a bucket of lukewarm water and rub regularly. No rinsing is required.
To eliminate encrusted dirt and to remove stains:
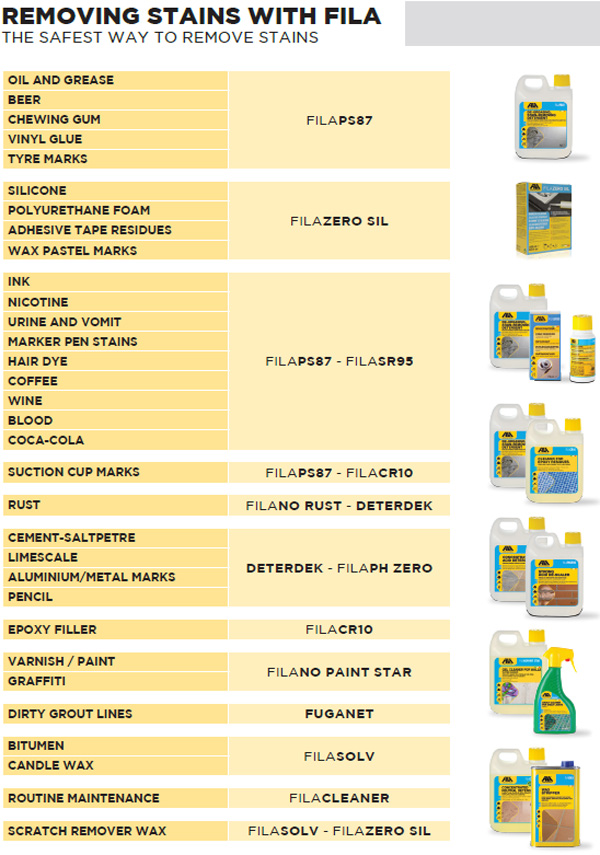
Encrusted dirt (beverages, food): FILAPS87 eliminates encrusted dirt on the surface.
To clean all surfaces:
Dilute 1:10 to 1:20 and apply to the surface. Leave to act for a few minutes then clean with a single-disc professional cleaner or a scrubbing brush. Vacuum or wipe up
dirt and then rinse with plenty of water.
For a deeper clean, dilute to 1:5.5. INSTALLATION GUIDE, USE, CLEANING AND MAINTENANCE
Upon delivery, once verified that materials correspond to documents and prior to install it is important to check that tonality, caliber and grade of material are in compliance. Furthermore, it is necessary that material does not carry any visible defect (such as chipping, rectification and calibration issues, etc.) since any claim will not be accepted after installation for materials whose defects can be detected before laying.
Given that shading belongs to ceramic products, aiming to obtain the best aesthetic results, it is suggested to mix tiles from different boxes in order to achieve an ideal blend. When working with “veiny” material, just as for natural stones, it is reccomended to follow the pattern to reach the best aesthetic and chromatic results.
Final customer has to ensure the best microclimate and lighting laying conditions, to allow the installer to proceed correctly, therefore inspecting the material and the undergoing work, as described above.
Installations is reccomended by using high performance specific adhesives. Be reminded that, at time of laying, the underlay must be set, dry and stable. Nevertheless, always follow guidelines provided by the manufacturers of laying materials.
Cement adhesives must be applied at room temperature or between 5° C-30/35° C.
Please refer to current UE Standards EN12004 for the most suitable flooring adhesives and laying products.
During laying, please avoid the use of graphite pencils and permanent marker on the tile surface, mainly on polished products.
While any use of water on tile is not necessary at the time of installation, it might be useful to apply clean water on the backing of the tile when particularly dusty.
Between laying completion and delivery to customer, always maintain floor clean and free of dust, cement, sand, mortar and any other materials which may cause staining and/or superficial abrasion issues.
It is important to protect laying area against likely third party traffic such as painters, electricians, carpenters etc.
In the case of “free-length” installations, please offset tile about 20 cm. maximum. With rectified tiles, please use a 2mm joint (this laying method enables a higher adhesive edge grip, better floor balance and absorption of any underlay shifting).
For unrectified tiles, please consider a 5mm joint.
SIMA CERAMICHE SRL will not accept any complaint with joints lower than 2mm.
Glazed porcelain is resistant material and can be shaped (to create tops, stairs etc.), drilled for sanitary wares using proper diamond blades and adequate equipment. -
Laying bed
Prepare a lean mixture with washed grainy sand without clay; lay a thin stratum of sand between the laying bed and the support; the laying bed has not to be less thick than 2 cm. for the inside floors and than 4 cm. for the outside floors. Dredge the surface with cement, then lay the tiles. Before the setting of this cement, beat the tiles in order to get a good penetration of them. However, to avoid the umpleasant inconvenience of the efflorescences owing to the types of sand used, we advise fixing with fix-adhesive on dry cement bed.
Expansion joints
The laid tiles must not be in contact. It is necessary to leave a space of 1-2 mm. between the tiles. As to the outside floors, it is very important to putty the spaces in order to avoid as far as possible the water seepage in the floor rough. As to the inside floors, consider expansion joints (regarding the laying bed too) of 25 mq. at least and of 5 ml. at the most. For the outside floors and for the localities which have severe weather, the floor surfaces which are delimited by elastic joints have not to be superior to 2-3 mq. If the outside floor is over habitable rooms; it is important to well impermeabilizie the substrusture; at the conjonction of the floor with a wall, the impermeabilization shall concern the wall too for at least 15 cm. in height. At the lowest of the waterproofing layer, a downflow of the water which could be percolated from the floor has to be considered. Leave then an empty space of cm. 1-2 near the pillars, the plinths and the walls. This space must be filled by a permanently and elastic material.
Gradient
The outside floors have to be a small gradient (1%) for the quick disposal of the rainfall water. The load bearing structure must have the same gradient of the floor in oder to carry out a laying bed of constant thickness (4-5 cm).
Period and laying conditions
Do not lay the tiles on a too fresh cement support which has not had its maximum shrinkage. It is better not to carry out the tile laying when it is too hot (+35° C) or too cold (-5° C). The outside floors have to be protected from the wind, the solar rays and the rain during the firts days after the tile laying. Avoid the passage on the floor for 6-7 days after the laying.
-
Among the most common defects due to a poor installation, cna be found moulds or efflorescences.
As follows, please find some useful suggestions in order to avoid this unpleasant inconvenience:- First of all use limeless mortars;
- When possible, use washed sand;
- Use water-resistant adhesives.
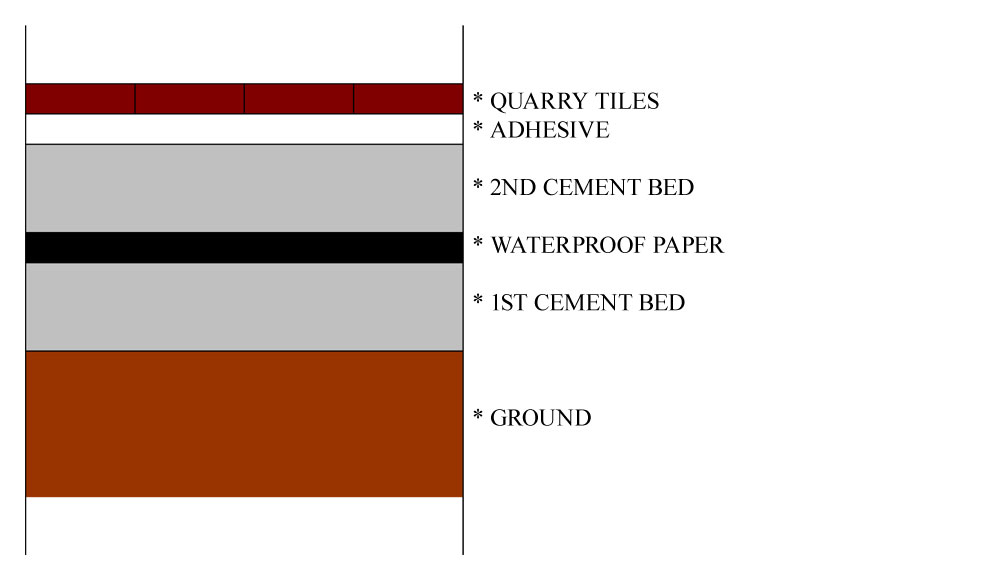
In case that material is outdoor installed with high ground humidity conditions, we strongly recommend to interpose inbetween the two existing cement beds a waterproof sheathing (bituminous paper or similar) in order to avoid underneath moisture to continously raise up to the surface showing efflorescence.
-
The white stains whitc appear on tile after laying are salts. This is a natural event which doesn’t arouses any worry and which is non attributable to our tiles. In fact our tiles cannot hold water+soluble salts because of the quality of the clay and the hight temperature of firing.
The saltsis melted into the water of mixture and reaches the surface through the pores of the tile, where; in contact with the air, the water evaporates while the salt remains on the surface of tile becoming white stains.
These salts appear preferably in parallel as the studs, as, here the thickness is higher and so the tile is more absorbent: for this reason there is the higher salts strenght.
This event stops when the mortar is completely dry: the necessary time varies from some days to several months according to the climate.
When the mortar is completely dry, you can clear the tiles using an acid solution (10% nitric acid and 90% water).
For taking away the more resisting stains, you can use the saw dust wet with this acid solution. Immediately after use, the saw dust must be taken away and the tiles must be washed with abundant water.In order to reduce the absorption of the tiles we suggest to use polishing wax, but, be careful, don’t use linseed oil or other unglazed floor polishing wax before the mortar is dry and the salts are completely appeared on surface throuch the pores of the tiles.
In fact the above products can stop the pores of the tiles and obstruct the emission of the salts melded into the water of mixture. -
Under construction.
-
1. Initial cleaning
1.1 To remove salt efflorescence, residues of concrete, and various kinds of dirt due to dust and traffic
Product: Deterdek
Coverage: Deterdek diluted in water 1: 5: 6 l for 100 m²
Equipment: Single-brush machine with green disc, liquid vacuum cleaner, flat brush, cloth.
Procedure: Wet the surface then evenly apply the Deterdek solution. Use a single-brush machine with green disc or floor brush with cloth to clean vigorously. (When this is done by hand, the cloth should be rinsed often in the washing solution). Rinse thoroughly with clean water, if necessary using a liquid vacuum cleaner.1.2 To remove residues of epoxy grouting
Product: Fila CR10
Coverage: Fila CR10 undiluted 1 l for 5-6 m²
Equipment: Single-brush machine with green disc, liquid vacuum cleaner, flat brush, cloth.
Procedure: Evenly apply Fila CR10 detergent and leave for about 20-30 minutes. Use a single-brush machine with green disc or floor brush with cloth to clean vigorously. Rinse thoroughly with clean water, if necessary using a liquid vacuum cleaner.2. Water-repellent protective treatment per outdoor surfaces: natural effect
Recommended for floors exposed to the elements (rain, snow, etc.) and for the prevention of water absorption.
Product: Fila ES/82
Coverage: Fila ES/82 5-10 l for 100 m²
Equipment: Large flat paintbrush, wax applicator fleece pad or other suitable method.
Procedure: Evenly apply one coat of undiluted Fila ES/82 (solvent-based water repellent), with a large flat paintbrush making sure the material is completely soaked. The surface is ready for use after 12 hours.3. Water- and oil-repellent stain protection treatment for indoor surfaces: clear effect
Recommended for floors where cars are parked or with a risk of oily stains (barbecues, fireplaces, etc.)
Product: Fila ES/82 – FILA FOB
Coverage: Fila ES/82 5-10 l for 100 m²
Fila FOB 5-10 l for 100 m² per coat
Equipment: Large flat paintbrush, wax applicator fleece pad or other suitable method.
Procedure: Evenly apply one coat of undiluted Fila ES/82 (solvent-based water repellent), with a large flat paintbrush making sure the material is completely soaked. 24 hours after application, evenly apply one coat of undiluted Fila Fob (solvent-based oil repellent), with a large flat paintbrush making sure the material is completely soaked. The surface is ready for use after 12 hours.4. Ordinary maintenance
The aim of ordinary maintenance is to remove dirt, scuff marks, etc. It should be carried out regularly and it is essential that the methods and products used do not harm the protection ensured with the initial treatment. Maintenance should be calibrated to suit need.
- For ordinary maintenance we recommend washing with Fila Cleaner, appropriately diluted in water (about half a glass in 5 l of water). No rinsing is required.
- For extraordinary maintenance, in other words when there are more stubborn stains, we recommend using the degreasing, stain removing detergent Fila PS/87. With this product, the surface must then be rinsed.
-


